Category Archives: snack
The ‘We knead to bake’ project #11: Swedish Cinnamon buns -Kannelbullar / Kannelsnegle (cinnamon buns/snails)

You need:
Starter:
Tear off chunks of the dough and add it incrementally into the bowl of the Stand mixer. keeping the machine running, gradually add the sifted flour mixture, Orange zest and the sugar and allow the ingredients to mix well.

If you’re making the spiral cinnamon rolls, spread the filling evenly over the whole rectangle

Roll the dough tightly in a jelly roll/Swiss roll style, gently pinching the edge to seal. Cut into 20 pieces using a sharp knife and place them on a lined baking sheet (making sure to leave enough space in between), or on a cupcake case.
For the twisted version, spread the filling over half the length of the dough as shown below. Fold over the half spread with filling and cut into 20 strips with a sharp knife. With each strip, cut a slit almost along the length such that the strip looks like a ‘trouser’.
 .
.
Twist each leg as shown above, cross the ‘legs’ over and press the ends together under the uncut part of the dough. As with the spiral rolls, place the rolls in a lined baking sheet or in cupcake cases with plenty of space in between.
Allow to rise for about 15 minutes (the buns will look a bit puffy, not fully risen), brush with milk and sprinkle pearl-ized sugar (or egg wash). Place in a preheated 400 F oven to bake for 15 minutes until they appear golden brown and sound hollow when tapped. If they seem to be browning too quickly, turn down the heat to 375 F.
Turn out to cool on a wire rack. Serve warm or at room temperature with a hot cup of coffee. These Kannelbullar freeze well, so store the extra away for a rainy day. Just heat one or two in a microwave whenever the craving strikes.

This post is being Yeast spotted.
The ‘We Knead to Bake Project’ 2013 – Torcettini di St. Vincent

The cookies have a lovely crunchy exterior that gives way to a chewy center, reminiscent of pretzels except that they are sweet from the sugar crystals with just a touch of saltiness from the dough.

(Adapted from ‘A Baker’s Tour’ by Nick Malgieri)
You need:


Bake them at 160C (325F) for about 25 minutes till they’re a nice golden brown. Cool the cookies completely, on a rack. Store them in an air-tight container at room temperature.

Serve as a tea time snack with a piping hot cup of Cafe au Lait or tea.

Bon Appetit!
Some tips to keep in mind:
Once your Torcettini have been shaped, don’t let them rise for longer than 20 minutes. If you do, your Torcettini will more bread-like on the inside due to the extra “rise”.
To make sure the Torcettini dough does not rise for more than 20 minutes, it’s a good idea to work on shaping the 2ndbatch while the first batch is in the oven.
 |
| A Gorgeous set of Pewter measuring spoons I picked up at my neighborhood yard sale! |
This recipe is being Yeastspotted.
Good wishes for ‘Vishu’ – Happy New Year!

The second week of April generally marks the New Year in many Indian communities. Baisakhi (Punjab), Rongali Bihu (Assam) , Ugadi (Andhra Pradesh, Karnataka), Gudi Padwa (Maharashtra), Varsha Pirappu & Vishu in Tamil Nadu and Kerala respectively. The week marks the passage of the Sun into the constellation Aries, and as with all other Indian festivals its marked by plenty of food as religious offerings. There is one particular tradition that makes Vishu an annual event to remember. Its referred to as the ‘Vishu Kani’ . The Lady of the house has a cornucopia of fresh fruits, vegetables, grains and dals along with money and jewelry arrange in a beautiful ‘Uruli’ (An artisanal cooking pot made with a bell metal alloy).In the centre of the dish is a mirror and large Lamps are lit. Children are led to the prayer room where the Kani is arranged and are asked to open their eyes to view themselves in the mirror. The belief is that it is auspicious to open ones eyes to prosperity first thing in the morning. The head of the family then hands out the ‘Kaineetam’ gifts of Money and new clothes (Oh yeah, Its just like Christmas!). For a detailed version of the festival, I’m going to refer you to Ammini Ramachandran’s informative article in Zesterdaily.
One of the classic desserts served up for a traditional Kerala Vishu feast is the Parippu payasam (a coconut milk and toasted mung based pudding sweetened with Jaggery) and a decadent Jam-like Pate made from Mango or Jackfruit. I hit it lucky this time around when I found some perfectly ripened Jack fruit at my local Indian grocery and converted it into this delightful dish with help from Mrs. Ramachandran’s recipe from her book ‘Grains, Greens and Grated Coconuts’
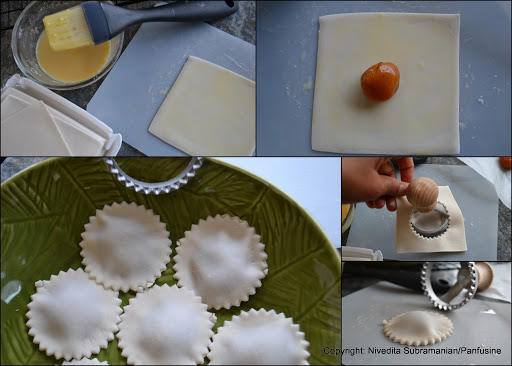
The chakkai varatti (as the jackfruit pate is called in Malayalam) in my recipe is used as a filling in a sweet ravioli, Its a delicious dessert morsel to savor warm with just a dusting of powdered sugar, or for an elegant plated dessert, you may serve the ravioli over a layer of traditional Paruppu payasam. Since the sweetness in both the payasam and the jam come from the same jaggery, this tends to confer a singular note. To counter this I’ve added some spice through the addition of Ginger (I used powder, but adding juice from the fresh root will work beautifully as well).
Chakka Varatti: (makes a little over 1 cup)
(Jackfruit Pate – Recipe from Grains, greens and grated coconuts by Ammini Ramachandran –I’ve reduced the quantity of Jaggery as per my personal preference. The original recipe calls for equal amounts of fruit and Jaggery, and ~1 cup of ghee )
You need:
3 cups jackfruit (fresh or canned)
2 cups crumbled Jaggery (Gud)
1/2 cup Ghee
1 cup water
Cut the Jack fruit into thin strips (deseeding the fresh pieces of fruit from the entire chunk needs another blog post and I’ll save it for later, in the mean time go ahead and get yourself 2-3 cans of the ripe fruit from the local Oriental grocery). If you do opt for the fresh fruit, do save the seeds, they taste just like chestnuts when roasted.

Add the strips to the water in a heavy bottom pan and gradually bring to a boil. once the fruit has softened enough to mashup when squeezed between the thumb and index finger, Mash the pieces thoroughly using the back of a wooden ladle. (Alternatively you could use an immersion blender, but that tends to completely puree the cooked fruit, resulting in a smooth pate)

Once the mixture has reduced in volume by about a third, add the crumbled Jaggery (test for sweetness as the canned fruit can be cloyingly sweet from the syrup ) and cook down the mixture on low heat, constantly stirring the bubbling liquid. I use a spatter shield as a guard to prevent any drops from scalding me accidentally. Add the ghee gradually by the tablespoonful and let it get incorporated into the thick paste. As the water evaporates, the Pate begins to leave the sides of the pan and you can see the ghee sizzling at the edges. Remove from heat and allow to cool completely before transferring into a glass jar for storage.

Paruppu Payasam:
I used a pressure cooker to make the payasam but making it in a conventional pan is equally easy.
You need:
1/3 cup crumbled Jaggery loosely packed.
1/4 cup yellow mung dal, toasted golden
1 can coconut milk
1 tablespoon powdered ginger or 1 tablespoon ginger extract from the fresh root
½ tsp Cardamom powder
Pressure cook the toasted mung dal till soft. Mash well and add the jaggery, ginger and coconut milk. bring to a boil and immediately lower the heat to a simmer and allow the flavors of the ingredients to combine well (~ 10 minutes). Allow to cool down and chill until ready to serve.
For the Ravioli:
1 cup All purpose flour + some more for dusting
1/4 cup 2 % milk
a pinch of salt
Knead into a soft dough.
OR
Store bought Wonton wrappers
Chilled Chakkai Varatti
Sesame Oil or Ghee for deep frying
1 teaspoon chickpea flour whisked with 2 oz milk for brushing
Spoon bits of the chakka varatti and roll them between your well oiled palms and set aside on a plate

 |
| Plated version 1 |
 |
||
| Plated Version 2 |
For a homely casual version, Allow the Ravioli to soak and soften in the Payasam and serve chilled. I call this version ‘Zuppa Keralese con ravioli’!!

Wishing all my readers in India a Wonderful, happy & prosperous New Year!
Chestnut ‘Chaat’ – (Literally) Finger licking good!


I opted to boil the chestnuts rather than roast them. You still have to score the tough outer shell and peel them but its a tad neater than having bits of charred shell all over the counter and your fingertips.
Once you peel the chestnuts, they kind of divide themselves into three categories, The good (the nuts that peel nice & clean), the bad (the kind you find a creepy green fungus growing) & the Ugly (the ones which still cling on to the inner peel)
 |
||
| Clockwise from top: Good, Bad & Ugly |
You can either scrape the reddish peel or leave it in some hot water to allow it to soften further to peel at a later time. As for those with the green fungi.. toss them straight into the garbage.
Chestnut and Potato Chaat:

You need:
~ 10 – 15 Chestnuts, scored across in a X
2 Idaho potaotes, parboiled and cubed
1/4 cup Mint/Cilantro chutney
1/4 cup Tamarind Date chutney ( A recipe for a quick hacked version is posted at the end)
1/4 cup finely chopped red onions
Store bought Chaat Masala to taste
1/2 cup fat free yogurt , whipped smooth (omit for a vegan version)
Fresh lime juice as per taste
Chopped cilantro and pomegranate arils for garnish
Oil for shallow frying
Add the chestnuts to sufficient quantity of water and bring them to a boil. Cover and allow to cook for 10 minutes. Keeping the chestnuts submerged in the hot water, remove them one at a time, rinse to cool under running water and peel off the tough outer shell and the reddish brown membrane. cut into quarters.
Heat oil in a skillet and panfry the pieces until the surface turns a golden brown. Remove on to absorbent kitchen paper. Repeat with the cubed par boiled potatoes.

In a large mixing bowl, combine the chestnuts, potatoes and red onions along with the green and brown chutney. Add yogurt & chat masala as per your preference. Fold to combine. Garnish with cilantro and pomegranate and finish with a splash of lime juice as required. Serve immediately with a cup of hot Masala Chai.

Bon appetit!
——————————————-
Quick Tamarind Date chutney:
1 ping pong sized ball of Tamarind.
1/2 cup hot water
2-3 tablespoons Lion brand Date syrup(available in most Indian grocery stores)
Chaat masala / shikanjvi masala blend and cayenne pepper powder as required
Soak the tamarind in the hot water and ‘massage to extract the pulp. Strain the pulp into a bowl and discard the fiber and seeeds from the tamarind. Whisk in the date syrup and season with the spice blends and cayenne pepper as per your preference.

Day 365.. technically a year.. Celebrating with a plate of Samosas

I’m actually breaking into song as I write this up. Albeit in my head, Frank Sinatra is crooning his timeless classic.. My Way..
Jan 1st 2012, Siri Pulipaka , the author of cookingwithsiri.com was just winding up her own daily blog ( of everyday events) and was encouraging others to experiment with similar projects. On a pure whim, I got myself a blogger page, with nary a thought about how I was to complete 366 dishes. It was never my intention to add recipes for classic day to day fare, just links if a particular dish was made using a recipe from other sites.
But, just as a new mother forgets everything about the intensity of her labor pain after seeing her infants face, I cannot recall anything hard or negative about this annual project. In fact, the support I received from everyone of you simply increased my motivation to kick back any lethargy and support every dish I could with recipes. The effort has paid off in terms of a repository of recipes that I hope to fine tune for future use. Thank you for making me go the extra mile.
My penultimate dish is a classic snack, the Samosa. Although this is a firm favorite in every corner of India, It may be safe to say that it is definitely a recipe from North India. (Yes, there are umpteen variations, but, the classic version is what I preferred to make for the family today)
Samosas with a Potato & Green Pea filling:
You need:
For the Casing:
1 cup All purpose flour
1/2 – 1/3 teaspoon kosher salt
2 tablespoons cold butter, cut into small pieces
1 tablespoon olive oil
1 teaspoon Bishops weed (Ajwain)
Water as required
Sift the flour, salt and ajwain together, add the butter and rub the flour between your finger tips. Work in the butter until the mixture resembles bread crumbs. drizzle in the oil and just enough water to bring in the mixture together into a dough, Knead lightly and cover with a wet tea towel until you’re ready to make the samosa casings.

For the Filling:
2 large Idaho potatoes, boiled and mashed
1/2 cup frozen green peas, thawed and boiled
1/2 teaspoon Dry mango powder (aamchur)
1/4 – 1/2 teaspoon Chili powder
salt to taste
2 tablespoons oil
1 teaspoon Cumin seeds
1 teaspoon coriander seeds, crushed
1 teaspoon garam masala
1 tablespoon finely minced fresh ginger
2 thai chiles finely minced
Juice of 1/2 a lemon
1/4 cup finely chopped cilantro
6 green chilies with stems, slit lengthwise
Oil for deep frying
Combine the potatoes, peas, the chile powder, salt and the aamchur. Heat the oil in a small skillet. When it just begins to smoke add teh cumin and the coarsely crushed coriander. When the cumin seeds split, add the garam masala. Allow the spice blend to bloom before adding it to the potatoes. Mix to evenly disperse the spices. Add the lemon juice, taste and adjust for seasoning. Make 12 ping pong ball sized portions from the filling.
Divide the dough into 6 balls. Using four as required, roll out the dough into a 6 inch circle. Using a Pizza cutter divide the rolled out dough into two semi circles.. Fold each semi circle and press down on the edges to make a ‘cone. Place a portion of the filling and seal the open edges firmly to make little pyramid. Repeat with the remaining dough.

Heat 1/2 L of oil in a cast iron wok. When the oil begins to shimmer on the surface, place 2 samosas at a time into the oil. Cook on medium heat until the the samosas are golden brown. Remove the samosas using a spider skimmer onto absorbent kitchen towels. Once the samosas have been fried, add the slit green chiles to fry up in the residual heat. remove and sprinkle the chiles with a dash of sea salt. Serve the samosas hot with a choice of spicy green cilantro mint chutney and sweet & sour tamarind chutney. Pair with a cup of piping hot Masala Chai.

Countdown for my ‘Dish – a – day blog’ – Day 10

Of all the countless New Year's resolution I've made over the past decades, I cannot really recall a single one that I've kept and seen through over the next 365 days. And when I started my other daily blog 'A Dish a Day' on a whim on Jan 1st 2012, I honestly never really expected to go past April (counting all the dishes I had whipped up for this blog and the numerous community picks that I've had the privilege of testing for Food52). This is not taking into account the inherent lethargy that I was sure , would make me skip days at my whim.
Delicata Squash Chips

Its right in the midst of fall, and my slacker self still lingers on it seems, for the Panfusine posts alone. My daily blog A Dish a Day steadily marches on towards the finishing line, hovering around the 300th post as I type this up. It was a great creative 8 days of making as many different ‘Sundals’ , (a South Indian Sauteed bean / lentils dish ), for the Festival of Navratri, The ninth day (today) having tragically cancelled due to the passing of a beloved cousin. Its hard to think of anything else today but the memories of my loving caring brother. But force myself I must.
With the change in season comes the bounty of squashes & pumpkins, one of them being the diminutive delicata squash. With a skin so fine that it slices effortlessly under the sharp blade of a mandolin, this variety of squash is perfect for tempura, bhajias and roasted salads.
With thin slices, it was delicious to discover that the squash transformed itself into healthy chips, crisped up in an oven seasoned simply with a dash of salt, paprika and a splash of olive oil. The Sugars in the squash tend to caramelize and crisp up rather than the starches frying up as is the case with potatoes and yams. Net result, the delicata slices get a lovely fried texture at lower temperatures and practically no oil. (most of oil used I in the chips, stayed behind as blobs on the baking sheet.)

Delicata Chips
You need:
4 smallish delicata squash
2 tablespoon olive oil
salt and paprika to taste
Heat the oven to 225 F.
Slice the blossom end of the delicata squash (with the scar) and scoop out the seeds.
Slice the squash using a mandolin (the thin setting). Toss well in a large mixing bowl with the oil,salt and paprika so that the seasoning coats the slices evenly)

Line 2 baking sheets with Aluminum foil and add the slices in a single layer. Place in the middle of the oven and bake for 40 minutes, taking care to rotate the trays at 10 minute intervals. At about 20 minutes, some of the slices will have crisped up to a light brown. Transfer these slices onto a dish.
From this point on, keep inspecting the slices at 5 minute intervals and removing them once they’ve changed color.

As for the seeds.. I simply add them on a smaller baking tray lined with kosher salt and pop them into the oven along with the squash. They toast up to a delicious nutty snack.

Kale tales & tempura

The flip side of festive days such as thanksgiving is this terrible sense of withdrawal symptoms that invariably strikes after the festivities are over.. Once the cleaning is done, the nice plates are put away and the last wine cork is located in the far corners of the kitchen counter & tossed out, a feeling of ‘now what do I do?’ sets in and no dish that the head conjures is ever good enough to beat. and no recipe that has been tried, tested & waiting to be posted seems to fit the bill (Take home message: Its not worth making & banking good recipes way too ahead of time)
When that happens I regress back to comfort foods that I know I’ll regret stuffing my face with.. This time around it was deep fried ‘Bhajia’, and a large mug of Masala Chai… at 10.00 am in the morning (doing this ought to rank with hitting the booze at 9.00 am, in terms of socio-culinary blasphemy), but it was delicious while it lasted. Weight watchers just got relegated to the back burner!
I had this gorgeous delicata squash left over from the previous dish that I had incorporated it into, and just could not bring my self to see it languish on the kitchen counter.

Coupled with half a bunch of Kale left over from thanksgiving, came up this sinful indulgence. I opted to use chipotle chile powder to incorporate a smoky flavor that complements the sweetness of the Delicata. Feel free to have fun with your own choice of spice blends such as Garam Masala or pav bhaji masala.
The coating of Panko (Japanese breadcrumbs, that are made by drying out only the centres of the bread) also adds a crunchy texture to the otherwise smooth batter covered squash (experimented with both versions with & without bread crumbs, , the one with the Panko won hands down!)
You need:
1/2 a delicata squash (seeds & stringy membrane removed),

2 cups shredded Kale

For the Batter:
2/3 cup Chickpea Flour (Besan)
1/3 cup rice flour
1 tsp Baking powder
1/2 – 1 tsp Chipotle chile powder (adjust as per your taste)
Salt to taste
~ 1 cup Seltzer water.
2 cups Panko bread crumbs
2 cup Canola Oil for deep frying.
Method:
Slice the Delicata squash using the thin setting of a mandolin (~ 2 mm thickness)
Remove the thick central vein of the Kale leaves & cut into a fine shred.

Heat the oil in a cast iron pan. Pour the breadcrumbs onto a large plate.
In a mixing bowl, combine the chickpea & rice flour, the spices, salt and baking powder & mix well to evenly disperse the ingredients. Add just enough Seltzer to make a thick batter that coats well to the surface of the squash.
When the oil gets sufficiently hot, dip 2-3 rings of squash into the batter evenly coating the surface.

Transfer the battered rings to the plate containing the bread crumbs and coat evenly on both sides. Drop gently into the hot oil & fry till both sides are golden brown. Remove onto a plate lined with kitchen paper towls to absorb the extra oil. Repeat until the squash is used up.
Add the shredded kale into the batter.

Mix to ensure that all the remaining batter coats onto the kale leaves. Drop spoonfuls of the battered kale into hot oil & fry till the Kale gets crunchy. Remove onto kitchen towels.

Cilantro biscuits

Aah summer… one week into the 80 F weather & I’m already complaining about it! Having said that, the heat is simple one of the many many aspects of what characterizes summer. Summer is the time for vacations. Growing up in India, It meant making good on those railway reservations that fathers had made in early march, (I’m NOT getting into the inefficiencies of the Indian Railways in the 1970’s..), or if you were one of those privileged, yet solidly middle class kids like me..taking your chances on the ‘subject to load’ staff passes that Air India generously offered its employees.
For about 4 hours, you were pretty much pampered in luxury, beginning with the ‘maharaja’ lounges at the airports (accessible to managerial executives with business class privileges) where they’d start the feeding process with finger foods such as cream cheese sandwiches with chutney, tiny samosas & those delicious savory puff pastries..IF & ONLY IF there were empty seats on the flight, which was a 50/50 possibility given the heavy summer traffic. One had to take into account that you could be making multiple trips to the airport and even (thankfully remote) offloaded the airplane after you were buckled in, simply because a fare paying passenger had rushed in 2 minutes before the counter closed & had to be given an upgraded seat because economy was full!…I remember breathing sighs of relief only after the wheels lifted off! & then the feeding began…Elegant service using linen, real silverware & fine porcelain!
Believe it or not, airline food was something to look forward to in those days and still is relatively quite pleasant on most Indian carriers even today..quite unlike the horrendous ‘greyhound buses on wings’ that fly the skies here in the US of A. And yet, ‘ airline – bashing’ is a national pastime for a lot of people from India. The very same individuals would probably smilingly accept the worst non reclining seats (32 B, E or a higher number on a non wide body aircraft) seated next to an absolute ***(take your pick of your least favorite co-passengers in this category) for a cross country red eye & wouldn’t let out a peep, traveling on carriers from other countries (oh yeah… you know who you are!!)!
Back to food, there was almost a separate genre of food prepared for train travel. The basic specs for these were that it had to keep well for at least 2 days and had to taste the same or better yet improve with age. This category eliminated most cooked dals and semi liquid curries, relying instead on dry vegetables to be paired with deep fried breads (which remained moist through the journey) , or chutneys & ‘thuvaiyals’ (if you were of south Indian extraction) with rice well seasoned with sesame oil.
Fast forward a decade into the 21st century, as much as a number of us travel to India for vacations, we also have our parents traveling to the US to spend precious quality time with us. For the more traditional & vegetarian set, it often is a challenge to find suitable food while traveling to some of the beautiful destinations across the US. At times, even as one gives in to pure decadent junk food at Denny’s & IHOP, a tinge of guilt creeps in when you see your In-laws or (especially) your own parents, nibble on a piece of dry toast with country crock, and reluctantly force themselves to finish the side of hash brown you so enthusiastically ordered.. (“just add some pepper amma, its exactly the same as potato curry“), yeah right, and all the while they know for a fact that the griddle was frying a juicy strip of bacon just before their potatoes landed on it!
Its often at times like these that one wishes that some of the beloved staples such as muffins and biscuits could be ordered in Indian flavors (and eggless to boot) . I had been toying with prototypes for this idea for a couple of months now and a breakthough came about when Food52 posted this simple and elegant recipe for cheese biscuits. The original recipe calls for the use of a stand mixer (which I’ve yet to invest in), so tried to mimic the technique manually with good results.
It involves no eggs (except for the egg wash that gives the biscuit a shiny finish on top) which makes it perfect for a South Indian adaptation. The cheese in the biscuits is replaced by home made coriander ‘thuvaiyal’.
As we all know coriander, that Indian kitchen staple is the first to turn into a slushy slimy compost sitting in the fridge. The minute the leaf is blended into a chutney, it starts losing its vibrant green color unless an acid such as lime or tamarind is added. and even then, its probably the condiment with the shortest shelf life. To extend the shelf life, the leaves were sauteed prior to grinding to reduce the water content and then ground to a thick pesto along with toasted urad dal, mustard and tamarind (remember using citrus would be adding extra liquid, so that is out!)
For the Cilantro pesto (‘thuvaiyal’) you need:
3 cups cilantro leaves packed (the stems tend to be fibrous and does not lend well to the biscuit’s texture)
3 tablespoons olive oil
1 teaspoon black mustard seeds
2 tablespoons dehusked split urad dal
2 dried red arbol chiles, broken into pieces
Salt to taste
1/2 a pod of dried tamarind pulp or 1/2 -1 teaspoon tamarind extract
A pinch of asafetida.
Heat a tablespoon of oil in a skillet and add the mustard seeds and Urad dal. When the mustard seeds pop, add the dried chiles and asafetida. Stir till the urad dal turns a deep golden brown. Remove & transfer to the crinding jar of a blender. Allow to cool.
In the same skillet, add the remaining oil and add the cilantro leaves and allow to wilt completely (the leaves will turn a dark shade of green). Lower the heat & keep stirring the leaves around to prevent them from getting burnt (~ 3-4 minutes). Transfer to the blender jar. Add salt & process till you obtain a smooth paste.
Transfer to a glass storage container and allow to cool completely before sealing the container (to avoid condensation).
For the Cilantro biscuits (technique adapted from Merill Stubbs recipe for cheese biscuits) you need:
3 1/2 cups all-purpose flour, plus more for shaping
2 tablespoons baking powder
2 teaspoons kosher salt
1 1/4 stick cold unsalted butter cut into small cubes
1/4 cup cilantro pesto
1 1/2 cup buttermilk.
Preheat oven to 400 F. Line 2 baking sheets with parchment paper.
Mix the flour salt and baking powder and chill the mixture in a fridge for about 30 minutes. Add the butter and cilantro pesto/thuvaiyal to the flour mix. Rub between your fingers to incorporate till there are tiny pea sized pieces of butter dispersed evenly in the flour. Add the buttermilk and mix till the dough just comes together.
Transfer to a floured board and knead gently with floured hands. Pat or gently roll to make the dough into a rough circle about 1/2 inch thick.

Cut into 3 inch (I used a 2 inch biscuit cutter) circles using a biscuit cutter. transfer to the lined baking sheets and bake for 20 minutes (turn the trays half way through the baking to ensure evenness.) till the tops are golden brown. (the finish will not be as glossy as in the recipe for cheese biscuits since there is no egg wash brushed over the biscuits). Remove from the oven & allow to cool. Serve warm with a pat of butter.

Bon Appetit!

4C shortbread

Shortbread traditionally has always been a Scottish biscuit, the ‘Short’ is indicative of shortening or the fat used in making these delicious & calorie rich treats.
Personally, I love making these since they do not involve the use of egg ( Don’t get me wrong, I’m fascinated by these protein packed globes that pop out from a hen’s rear end, but have this odd avoidance/ phobia about working with them.. It had something to do with a mildly traumatic incident involving my 8th birthday cake, a broken window… Someday If I write my biography, I’ll tell the tale!)
Food52 my favorite community blog, had this contest with coffee as the theme ingredient last week. & the number of fabulous recipes that were sent in was simply amazing! The enthusiasm itself was worth creating a tribute dish for & the 4C shortbread was my contribution! The Inspiration came from 3 individuals and the dishes they had submitted for the contest. Bevi, a food consultant from Vermont who had a fabulous recipe for a versatile shortbread with many options, Tiggybee from California with a fabulous recipe for a spiced Iced coffee and Pauljoseph from Kerala, who is an amazing source for wonderful recipes & morsels of amazing trivia related to food. You simply HAVE to check this wonderful site out! Something that everyone on food52 looks forward to, is Pauljosephs photographs of spices, herbs, fruit & veggies we so much take for granted in daily life, yet, know little of about how they look in their native habitat.
The spices and flavorings used in this recipe are are found in God’s own country, Kerala, Cardamom, cloves, coffee & Cream… it seemed fitting that these four terms should come together to form the ‘4C’ (which incidentally, is also a term used to describe quality in Diamonds! speaking of Diamonds… here’s a lovely ad for those shiny bits of coal… Disclaimer: Tanishq is NOT involved in Iyer n’chef!). The bonus is that my kitchen started smelling like I was brewing a cauldron of rich creamy coffee, that alone was enough for a wonderful buzz!!

For this ridiculously easy snack you need:
- 1/2 cup brown sugar
- 8 tablespoons unsalted butter at room temperature
- 2 teaspoons instant coffee granules (taster’s choice french roast worked for me)
- 6 pods cardamom,
- 4 cloves
- 2 tablespoons light cream
- 1 1/4 cup All purpose flour
- 1 pinch salt
- Using a mortar & pestle, crush the cloves, cardamom seeds & the coffee granules to a smooth powder.
- Cream the butter & sugar till well combined. add the spiced coffee powder & cream, whisk a little longer till light & fluffy.
- Sift the all purpose flour and the salt. fold the flour into the creamed butter and work till the flour is incorporated completely and the mixture comes together into a ball. wrap in plastic wrap & chill for an hour in the refrigerator
- Preheat oven to 350 F.
- Remove the dough from the refrigerator, roll out to a 1/4 inch thickness (using extra flour for dusting). Using a cookie cutter, cut out the dough and place onto a cookie sheet.
- Bake for ~ 10 minutes or until the lower surface of the cookies starts turning a golden brown. remove & cool on a wire rack. Store in an airtight jar.
- Serve alongside a hot cup of…..tea or hot chocolate!!

