Category Archives: decadent
Good wishes for ‘Vishu’ – Happy New Year!

The second week of April generally marks the New Year in many Indian communities. Baisakhi (Punjab), Rongali Bihu (Assam) , Ugadi (Andhra Pradesh, Karnataka), Gudi Padwa (Maharashtra), Varsha Pirappu & Vishu in Tamil Nadu and Kerala respectively. The week marks the passage of the Sun into the constellation Aries, and as with all other Indian festivals its marked by plenty of food as religious offerings. There is one particular tradition that makes Vishu an annual event to remember. Its referred to as the ‘Vishu Kani’ . The Lady of the house has a cornucopia of fresh fruits, vegetables, grains and dals along with money and jewelry arrange in a beautiful ‘Uruli’ (An artisanal cooking pot made with a bell metal alloy).In the centre of the dish is a mirror and large Lamps are lit. Children are led to the prayer room where the Kani is arranged and are asked to open their eyes to view themselves in the mirror. The belief is that it is auspicious to open ones eyes to prosperity first thing in the morning. The head of the family then hands out the ‘Kaineetam’ gifts of Money and new clothes (Oh yeah, Its just like Christmas!). For a detailed version of the festival, I’m going to refer you to Ammini Ramachandran’s informative article in Zesterdaily.
One of the classic desserts served up for a traditional Kerala Vishu feast is the Parippu payasam (a coconut milk and toasted mung based pudding sweetened with Jaggery) and a decadent Jam-like Pate made from Mango or Jackfruit. I hit it lucky this time around when I found some perfectly ripened Jack fruit at my local Indian grocery and converted it into this delightful dish with help from Mrs. Ramachandran’s recipe from her book ‘Grains, Greens and Grated Coconuts’
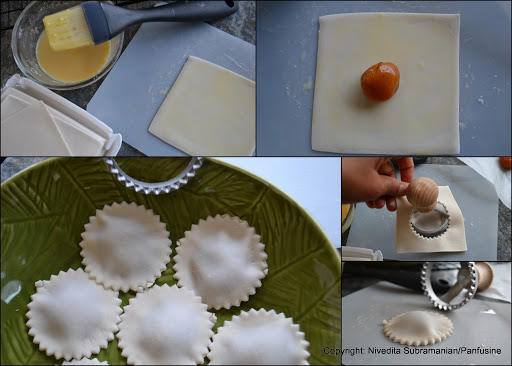
The chakkai varatti (as the jackfruit pate is called in Malayalam) in my recipe is used as a filling in a sweet ravioli, Its a delicious dessert morsel to savor warm with just a dusting of powdered sugar, or for an elegant plated dessert, you may serve the ravioli over a layer of traditional Paruppu payasam. Since the sweetness in both the payasam and the jam come from the same jaggery, this tends to confer a singular note. To counter this I’ve added some spice through the addition of Ginger (I used powder, but adding juice from the fresh root will work beautifully as well).
Chakka Varatti: (makes a little over 1 cup)
(Jackfruit Pate – Recipe from Grains, greens and grated coconuts by Ammini Ramachandran –I’ve reduced the quantity of Jaggery as per my personal preference. The original recipe calls for equal amounts of fruit and Jaggery, and ~1 cup of ghee )
You need:
3 cups jackfruit (fresh or canned)
2 cups crumbled Jaggery (Gud)
1/2 cup Ghee
1 cup water
Cut the Jack fruit into thin strips (deseeding the fresh pieces of fruit from the entire chunk needs another blog post and I’ll save it for later, in the mean time go ahead and get yourself 2-3 cans of the ripe fruit from the local Oriental grocery). If you do opt for the fresh fruit, do save the seeds, they taste just like chestnuts when roasted.

Add the strips to the water in a heavy bottom pan and gradually bring to a boil. once the fruit has softened enough to mashup when squeezed between the thumb and index finger, Mash the pieces thoroughly using the back of a wooden ladle. (Alternatively you could use an immersion blender, but that tends to completely puree the cooked fruit, resulting in a smooth pate)

Once the mixture has reduced in volume by about a third, add the crumbled Jaggery (test for sweetness as the canned fruit can be cloyingly sweet from the syrup ) and cook down the mixture on low heat, constantly stirring the bubbling liquid. I use a spatter shield as a guard to prevent any drops from scalding me accidentally. Add the ghee gradually by the tablespoonful and let it get incorporated into the thick paste. As the water evaporates, the Pate begins to leave the sides of the pan and you can see the ghee sizzling at the edges. Remove from heat and allow to cool completely before transferring into a glass jar for storage.

Paruppu Payasam:
I used a pressure cooker to make the payasam but making it in a conventional pan is equally easy.
You need:
1/3 cup crumbled Jaggery loosely packed.
1/4 cup yellow mung dal, toasted golden
1 can coconut milk
1 tablespoon powdered ginger or 1 tablespoon ginger extract from the fresh root
½ tsp Cardamom powder
Pressure cook the toasted mung dal till soft. Mash well and add the jaggery, ginger and coconut milk. bring to a boil and immediately lower the heat to a simmer and allow the flavors of the ingredients to combine well (~ 10 minutes). Allow to cool down and chill until ready to serve.
For the Ravioli:
1 cup All purpose flour + some more for dusting
1/4 cup 2 % milk
a pinch of salt
Knead into a soft dough.
OR
Store bought Wonton wrappers
Chilled Chakkai Varatti
Sesame Oil or Ghee for deep frying
1 teaspoon chickpea flour whisked with 2 oz milk for brushing
Spoon bits of the chakka varatti and roll them between your well oiled palms and set aside on a plate

 |
| Plated version 1 |
 |
||
| Plated Version 2 |
For a homely casual version, Allow the Ravioli to soak and soften in the Payasam and serve chilled. I call this version ‘Zuppa Keralese con ravioli’!!

Wishing all my readers in India a Wonderful, happy & prosperous New Year!
Croissants, South Indian style – Pain au ‘Poornam’

Ahh the lingering enduring pleasure of taste memory..Its been almost three weeks since I tucked happily into these buttery pastries and here I am already getting set to start making plans for an encore. I'm planning to experiment with a different filling but before I add that to my repertoire of croissant flavors, I just have to write this recipe up before the details gradually fade away, like the spice notes of cardamom & saffron that completely had me under their spell.
Read more »
The ‘We Knead to Bake’ project 2013 : Classic Croissants

As divine as they are, it is virtually impossible to polish off 16 at one go, so feel free to divide the dough on day 3 and return one half of it to the refrigerator (if you plan to use it up within the next day or two, or freeze it for use at a later time). I opted to used a South Indian style filling on my second half,made with fresh coconut, jaggery and cardamom. This filling is a classic recipe called ‘Thengai poornam‘ in Tamil. It is used for ‘Modak‘, a sweet rice dumpling. I decided to christen this version ‘Pain au poornam’! I’ll post this recipe next week once the foundations of prepping the classic croissant dough have been established.
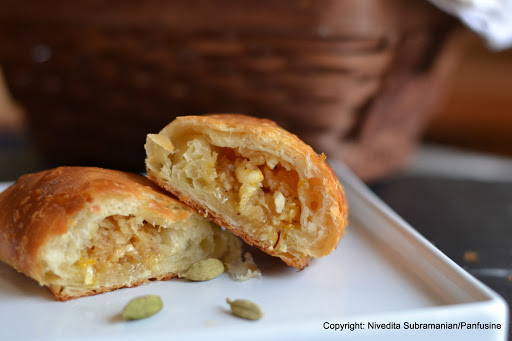 |
| Pain au ‘Poornam’: Croissants with a coconut, jaggery & cardamom filling |


Bon appetit!

Minty ‘Marriage proposal’ potatoes

Foodie meet up – Eataly NYC

Cure for the blues – T-B-A (Tata – Birla – Ambani) Shortbread

(T-B-A … Tata – Birla – Ambani. For those of you unfamiliar with Bollywood lingo, these powerhouse Industrial names are synonymous with wealth & riches in India)
(Crore: a numerical term used in India, equivalent to 10 million;
Crorepati : Some one whose net worth is over 10 million rupees)
For recipes like this, the lesser said the better. Yapping on and on about inspirations etc is like teasing a puppy by holding a delectable treat just out of reach.
As far as decadence goes, it can’t get any better (or easier) than a tray of millionaire’s shortbread. I mean, whats not to love? – buttery shortbread, salty caramel, decadent chocolate ganache.
The combination of crunch shortbread, a delicately chewy caramel & silky chocolate makes for a textural treat for the tongue.
OK.. have I annoyed you enough? I found my inspiration from Merrill Stubb’s recipe from Food52. The touches that give it the Indian touch is the trio of spices that flavor each layer. Ground ginger in the shortbread, cardamom in the caramel & a touch of long pepper (Pippli/ Thippili) in the ganache. So here goes.. The ‘Crorepati shortbread’
Crorepati Shortbread:
(recipe adapted from Merrill Stubb’s recipe on Food52)
Makes about 16 pieces (and a generous bit of the yummy edge)
Shortbread layer:
1½ cups all-purpose flour
1/2 teaspoon kosher salt
5 tablespoons sugar
1 1/2 tablespoon powdered dry ginger.
12 (1 1/2 sticks) tablespoons unsalted butter at room temperature
Preheat oven to 350 F . Line a 9 x 9 inch square baking ban with parchment paper.
Sift the Flour, salt, sugar and dry ginger into a mixing bowl.

Cut the butter into small cubes. Add to the dry mixture. Mix with a fork & gently fold together until the mixture combines to make a soft ball of dough.
Transfer the dough to the baking pan and press into an even layer (Using a large offset spatula for this works great). Using a fork, prick holes all over the dough.

Bake in the oven for about 25 minutes until the top is golden brown. Remove from oven and allow to cool.

Caramel layer :
(Sorry, no pics for this round, I was too busy focusing on getting this tricky layer right)
1¼ cups sugar
¼ cup water
5 tablespoons heavy cream
seeds from 6 – 7 pods of cardamom powdered fine
5 tablespoons salted butter, cubed
1 tablespoon crème fraiche
Combine the cream with the cardamom powder.
Heat the water and sugar in a heavy bottomed pan. Bring to a boil, swirling the pan until the sugar completely dissolves. Simmer for an additional 10 minutes till the sugar begins to turn into a deep amber color. (Watch the pot carefully at this stage. You don’t want the mix to start getting burnt). Remove the pot from the heat, and add the cream carefully while vigorously whisking the mix. The mix will bubble furiously, so take extreme care. Add the butter, followed by the creme fraiche ( For those of you in India who are fortunate enough to make yogurt every day, simply skim the heavy creamy layer off the top of the yogurt, whip to a smooth consistency with a fork & use).
Once the caramel has cooled down to a point where you can touch it, pour the layer over the shortbread. Tilt the pan to ensure that the caramel spreads evenly all over the shortbread layer and tap gently to get rid of any bubbles. Allow to chill in the refrigerator while you make the chocolate.
Chocolate layer:
1/3 cup heavy cream
4 oz. semisweet chocolate, chopped
1/2 a long pepper grated over a microplane (or 1/4 tsp black pepper)
Himalayan pink salt crystals for garnish.
Heat the heavy cream along with the spice & bring to a boil. Add the semisweet chocolate and whisk into a smooth shiny consistency. our over the shortbread/caramel layer, tipping & tappling to get an even layer minus any annoying bubbles. Allow the chocolate to set at room temperature for about 30 minutes.

Finish with a sprinkling of salt and place in the refrigerator for about 2 hours before removing the confection out of the baking pan & cutting it.


These make a great gift, placed into little paper cups & boxed with a ribbon.

& the crumbs and ‘imperfect pieces’ are a great treat to mop up with a cup of coffee!

Bon appetit!
Marmalade marathons..& a recipe for rustic thumbprint shortbread

Produce wise, I have no complaints about the past 12 months. Seasonal local vegetables from Hillsborough farm throughout the summer and a wonderful time exploring citrus varieties after that. My clear favorite was the Mayer lemon. I simply fell in love with its vivid color, fragrance and sweet/tart taste. The best priced ones were from Whole Foods, priced at a modest 3.49 /lb (about 6-7 lemons). Indulged in making ‘achar’, preserved lemon, Lemon rice, margaritas & a dozen bottles of marmalade! (this was in addition to a community pick testing for Food52 , a fragrant Five-citrus marmalade.

Back to Meyer lemons. What?: A hybrid citrus thought to be native to China, a cross between lemon & mandarin orange. The skin is smooth and thin with minimal white pith, while the juice is not quite as tart as a regular lemon and it has a faint trace of orange, no doubt from its mandarin genes.

Making a marmalade, I learned, is not for the beginner cook. It requires a good hefty dose of old fashioned labor. Just slicing through 10 lemons takes time, a task which seemed trivial though after I had gone through chopping 2 pomelos (huge chinese grapefruit similar to pamplemousse better known as ‘pumplimaas’ in Tamil) and a generous assortment of other citrus. If dedicated cooking is your passion, then here is my recipe for a yummy Mayer lemon marmalade spiked with crystallized ginger and cardamom. The recipe is adapted from Epicurious.com and I believe the original recipe was featured in Gourmet magazine in Dec. 1999.
Mayer Lemon Marmalade with crystallized ginger and cardamom (makes 10 1/2 pint jars)
You need:

10 Mayer lemons (or 8 regular lemons)
6 cups water,
6 cups sugar
1.5 cups finely chopped crystallized ginger
1 tablespoon powdered cardamom
10 sterilized 1/2 pint canning jars with sealing ring lids.
Cut the lemons into halves and remove and reserve the seeds/pips. Tie up the seeds in a cheesecloth/muslin cloth/bag. (If you’re South Indian or related to one, look for a clean ‘veshti’ or ‘angavastram’ to rip off a piece!)

Cut the lemons once again into quarters and slice thinly. Combine the lemon, water and the bag of lemon pips in a large non reactive pot. Cover and allow the mixture to rest at room temperature for a whole day. (yes, 24 hours).
Add the crystallized ginger pieces to the Lemons the next day and bring the mixture to a boil. Reduce heat and cook down the liquid until the quantity reduces to less than half the original volume (~ 1 hr).

Add the sugar and the cardamom powder and boil over medium heat, taking care to skim off any foam. Using a candy thermometer, monitor the temperature. (which is going to stay at 212 F for a LOOONG time ~ 1/2 hr).
Once all the residual water has evaporated, the temperature of the thick jammy mixture will quickly rise to 220 F. Immediately switch off the heat & remove the pot.
Ladle the marmalade into the sterilized jars leaving about 1/4 inch air gap at the top to allow for vacuum sealing. Wipe the rims thoroughly clean, screw on the lid & ring & tighten till the point of minimum resistance. Allow to cool slightly and then process in a vacuum bath canner. (I like to follow the timing prescribed from a post on Indian Food Rocks, viz, 10 minutes at sea level adding a minute for every additional 1000 ft above sea level, depending upon where you live).
Thumbprint shortbread cookies (with the marmalade that you just made!)

You need: (about 12-15 cookies)
1 cup All purpose flour
1 teaspoon baking powder
1 stick (8 tablespoons) unsalted butter, at room temperature
2 tablespoons sugar
1/8 teaspoon table salt
1 tablespoon Orange zest
1/4 cup of marmalade or any of your favorite store bought jam
Preheat oven to 325 F.
Sift the All purpose flour, sugar,salt and the baking powder together in a mixing bowl.

Add the butter and the orange zest (I used the frozen variety from Perfect Puree) to the flour blend. Using a silicone spatula, gently combine the ingredients together to form a dough.
Using a cookie scoop, measure out equal portions onto a cookie sheet lined with parchment paper. (I personally like a rustic looking edge, but for a smoother circular shape, gently roll the dough into a sphere using your palms)
Gently press down to flatten. Using your thumb, make a well in the center of the dough.

Fill the wells with 1/4 teaspoon of your favorite jam or marmalade.

Bake at 325 F for 20 minutes, turnin the baking sheet around 180 degrees halfway through the baking process. until the base begins to turn a golden brown color
Cool the cookies on a cooling rack (they crisp up slightly upon cooling) and serve these rich buttery morsels with a hot cup of coffee or tea.

Bon Appetit!
Tramping for Ramps..Season 2, Paneer & Peas in a creamy Ramp sauce.

Spring… you definitely know its here when you spy these beauties in a single basket on the supermarket grocery shelf.. accompanied by a gasp inducing price tag.. ~ $12.99 /lb.. Black Truffles, they ain’t, but addictive & seductive enough to compulsively buy some each time I make a visit.
I’m referring to Ramps, that all American wild onion that peeps out from swampy shaded land all the way from the south to Canada.
The term Ramps derives from the Old English word Ramson, the term used for another wild species of onion , the European bear leek. Resembling scallions with broad green leaves, the flavor has been described somewhat as similar to ” fried green onions with a dash of funky feet”.

If Wikipedia is to be believed, the city of Chicago (shikaakwa translated as ‘wild onion’, in the local Native American language) got its name from the wide swath of wild ramps that once grew in the area.
I’ve been hooked on to ramps for over a year now, when I meekly experimented with the vegetable by combining them with potatoes & added them to a Pasta dish , and before I knew it, the ramp season was over!, so a year later, Here’s recipe # 3 – a Mutter Paneer in a creamy ramp flavored Makhani sauce.

In order to ensure that the ramps flavor is not overshadowed, The only ‘heat source for this decadent dish comes from crushed pickled green peppercorns. (They should be available at the local Indian grocery, look out for ‘Lakshmi’ brand green pepper pickles. Thanks Indian Food Rocks for asking me about it!)
Paneer & Peas in a creamy Ramp sauce.

You need:
8 stalks of Ramp, stems & leaves (chopped into thin strips)
8 oz. block of Paneer cut into 1/2 inch cubes
1 cup frozen peas
2 cups skim or low fat milk
2-3 tablespoons sour cream
1/8 teaspoon turmeric powder
1/2 teaspoon Garam Masala
Salt to taste
1 sprig (~ 15-20) pickled peppercorns, smashed
2 tablespoon vegetable oil
Sprigs of fresh mint for garnish
to be ground to a paste:
8 ramp bulbs, (the white part)
1 large onion, (I prefer white, but the red ones will do in a pinch)
1/2 cup broken cashew nuts
2 tablespoons minced ginger root
2 tablespoons unsalted butter
Blend the ramp, onions, cashew & ginger into fine paste preferably without using any additional water.
 |
| The lavender color is due to the red onions used! It disappears once the mix is sauteed. |
Heat the butter in a large skillet and add the cashew paste. Saute on low heat, until the mixture loses that raw onion aroma.
Heat vegetable oil in another smaller non stick skillet and saute the frozen peas. Add the ramp stalks & leaves & allow to wilt.

Transfer to wilted greens & peas into the cashew mixture, along with the Paneer, crushed peppercorns (Add a little in the beginning and increase as per your personal taste) turmeric, salt and garam masala.
Mix to combine. Add the milk, gradually into the curry, stirring all the while. Simmer on low heat until the flavors combine. Stir in the Sour cream& transfer to a serving dish. Garnish with mint & serve warm with Parathas or Roti.

Bon Appetit!
Love, Indian ‘ishtyle’ – Masala Milk Truffles

For those of you readers in India.. Remember those old Everest Milk Masala ads & jingles? of prospective brides trying to impress potential parents-in- law by serving them Masala Milk? Well, I tried to look up some on You Tube but those old ones were nowhere to be found. Instead, there were new ones still revolving around the theme of family & love like this one in Marathi.
Masala Milk is a comfort food of the liquid variety that is popular all over India, irrespective of language or state. Scaling hot milk evaporated down to incorporate caramelized threads of milk solids and sweetened with sugar & coarsely crushed pistachio & almonds.
What is it about Masala Milk that evokes love, caring & sharing? Perhaps, Its the comforting offering of nutritious milk, or the rich sharing of nuts, which are not easy to come by for most families. You just have to read this article by Raghavan Iyer to understand what I’m trying to convey.
O.K, so Valentine’s day doesn’t exactly refer to family love.. its more of a romantic notion.. well, then just go look up any cheesy Bollywood movie referring to post wedding nuptials, and you’re bound to come across a shy bride entering the bedecked bedroom holding a pitcher in her hands along with a couple of silver glasses.. Anybody wanna guess what it contains? Yep… Masala milk.. How much more mush & romance do you want me to yap on about??
On the other hand, Valentines day is intrinsically woven into that avatar of ambrosia, Theobroma cacao, a.k.a Chocolate, and chocolate boutiques & brands make a killing selling these divine morsels. (I bet they were all in it together & simply appointed Hallmark cards to take the lead & declare Feb 14th as a day dedicated to love).
If this blog post won’t get you HOOKED onto chocolate, I don’t know what will. I mean, just look at those pictures.. Yes, I may be borderline star struck after last weeks taping session with Kelsey Nixon, She is such a bubbly and charming person in real life. The Perfect 3 opportunity definitely gave me the confidence to attempt dishes that I would have passed on in favor of easier ones. What better ingredient to start than with Chocolate, the flavor of the month. So here it is, a fusion of love offerings from 2 different cultures..The Masala Milk truffle.
The center filling is a white chocolate ganache flavored with Chai spice blend and powdered toasted pistachio & almonds.
 |
||
| Chai Spice blend |
Masala Milk Truffles: (makes ~ 32)
1/2 cup heavy cream
Crystals of Thai Ginger flavored salt or Pink Himalayan salt
Method:
Crush the toasted pistachio & almonds into a semi fine consistency and mix thoroughly. Measure 1/3 cup of the combined mixture and reserve. Add the white chocolate chips to the 1/3 cup of nut blend & combine in a glass mixing bowl.

Add the chai spice blend to the heavy cream and heat until the cream just comes to a boil. Immediately lower the heat to a minimum and simmer the cream mixture for about 5-10 minutes to allow the spice blend to release its flavors. Remove from heat and allow to cool slightly.

Strain the spiced cream into the white chocolate chip blend. stir to melt the chocolate completely (feel free to heat in the microwave for 30 seconds extra) to obtain a smooth texture (well almost, the powdered nuts add a lovely graininess to the ganache). Cover the surface with cling wrap and refrigerate till cooled & firm. (about 1 hr)

Using a melon baller, scoop the ganache and roll it into marbles. freeze until solid (at least 2 hrs).
 |
| Those Cocktail Idli steamer plates are perfect for holding the ganache! |
Add the dark chocolate chips into a heat proof bowl and melt over a saucepan of simmering water. When the chocolate has completely melted, dunk the spiced ganache marbles into the dark chocolate and coat all over. Gently place on a tray lined with wax paper to set. Once the shell hardens, transfer the truffles into paper cups , garnish with the salt crystals and refrigerate in a dry container.

This is how the cut up cross section looks..

As for the remaining melted chocolate, just add about 2 -3 oz of boiling water along with 2 teaspoons of orange zest and whip furiously over ice cubes to get a serving of this totally insane mousse.. Follow this link for the original genius recipe.

Wishing every one of you a wonderful Valentine’s day filled with love from near & dear ones.
