Category Archives: Bread
The ‘We knead to bake project’ # 10 – 100% Whole wheat bread

When using flours that are not subject to heavy processing like all purpose flour is, its essential to understand the starting material in order to create a flavorful bread. WHeat flour is a jumble of bran, germ & starch. Starch yields the familiar flavor of bread, but cannot effectively do so in the presence of plain bran & germ. These nutrient rich components need to be coaxed to release their flavor, soften and undergo a bit of enzymatic change before they release their goodness, and Reinharts technique aims to ensure that perfectly.
I opted to use Lemon juice in the soaker and sponge in order to help the strands of gluten develop (gluten is a protein which ‘clump’ together in the presence of acid) and also boosted up the gluten up a notch by adding a bit of extra wheat gluten. My first loaf was with a regular whole wheat flour without gluten, the second with a coarser whole wheat Pastry flour, and the third with an organic whole wheat flour from India that I use to make roti. Needless to say the softest was the third one, while the pastry flour bread yielded a nutty flavor & a chunky texture. The first loaf I made was riddled with a number of errors and did not rise quite as much as a consequence.

Step 1- Making the soaker and the Biga/Sponge:


The ‘We knead to bake project’ 2013 – Savory Kugelhopf

It never fails to amaze me how it seems like a short while ago that the new year had rolled in and a bake-crazy bunch of us bloggers signed on to Aparna Balasubramanian’s suggestion that we collectively bake one yeasted recipe a month and post it on our respective blogs as a group. Before I knew it, we were half way through the year and I had made 6 wonderful breads that the family loved. Of course, there was a slight hiccup when my kitchen went out of commission and I’m quite happy about the fact that this post will push me into the ‘current’ status.
July’s assigned bread was a yeasted savory bread referred to as ‘Kugelhopf’ or gugelhupf in the southern regions of Germany, Austria and regions in Alsace. Its basically a rather large cake baked in a Bundt pan and the original sweet version calls for raisins, almonds and Kirschwasser or Cherry brandy. There is a colorful history regarding its origins, Austria, Alsace, Germany all lay claim. For details, I’ll take the easy way out and simply refer you to Aparna’s post from my Diverse Kitchen.
I opted to give my version of bread (an egg free version that used Flax meal instead) a touch of Mexican flavors with roasted Poblano peppers, sundried tomatoes, smoked ancho chile pepper, and a sharp, smoky spicy Chipotle Cheddar from Cabot Creameries.
The end result was a perfectly soft, yet texture rich bread with the right amount of heat from the chiles and redolent with the aroma of Mexican oregano. Toasted pumpkin seeds add a pleasant crunch to the slices.

6 tablespoons boiling water


This Kugelhopf should serve about 10.
The ‘We Knead to Bake’ Project 2013 – Bialys (with toasted shallots in a Tamarind relish)


This spicy & tangy relish is the flavoring behind the iconic Tamarind rice and many a South Indian emigre to the US of A and all over the world are guilty of smearing their toast with a dab of this umami laden relish. (I’ll post the recipe for the relish in an upcoming post, but its readily available in most Indian grocery stores).

 |
| Spiced Tamarind & Shallot (r) & sauteed Leeks with Za’atar seasoning (l) |
Place the shaped dough on a parchment lined (or greased) baking tray leaving about 2 inches space between them. Place the caramelized onion filling in the depressions of each Bialy. Brush the outer dough circle with milk.
 |
| Filled with Leek & Za’atar seasoning, brushed with milk and waiting to be baked.
Bake the Bialys at 230C (450F) for about 15 minutes till they’re golden brown in colour. Cool them on a rack. Serve slightly warm or at room temperature. I found that the Bialys keep well in an airtight container for a day or two and just need to be warmed up slightly before serving with a generous dollop of fresh Cream Cheese.
|

Alternate fillings:
finely slice a cleaned leek (just the white and light green parts) and sautee until translucent in one tablespoon of olive oil. Add 2 tablespoons of Za’atar to the leeks and season with your preferred amount of salt. Allow to cool and fill the Bialy’s as per the recipe.
Bon Appetit!. & yes, this recipe is being Yeastspotted
A No – brainer solution for those ‘Naan’ cravings – No knead ‘Tadka Bread’


Heat the 2 tablespoons of oil until almost smoking and add the spices. Once they begin to sputter and emit their characteristic aroma, remove from heat and allow to cool slightly before adding into the flour (you do not want to add the scalding hot spice blend into the flour directly , just in case it scorches up the yeast!)

Add 2 cups of the diluted into the flour and mix well with a wooden spoon to ensure that all the flour is soaking in the liquid (if the mixture still ‘blows’ out flour and comes together as a ball, add a bit more of the liquid).
Drizzle some of the oil over the mixture, cover with a cling wrap and place in a cold oven with the light on. In the meantime liberally brush the bottom and the sides of two circular 9 inch baking tins with oil.
Allow to rest and rise for about 2 hours until the volume doubles and the dough can easily be pinched off the surface revealing an abundance of air bubbles.
Preheat the oven to 425 F.
Punch down the dough (which will be quite sticky & viscous) and divide the dough into the two tins. divide the remaining oil evenly between the two tins and using your finger tips press down on the dough to cover the bottom of the pan. Brush liberally on the top with milk and bake in the oven for about 20 minutes, turning the tins half way through the process. Check to see the ‘doneness’ by tapping on the bread. if it sounds hollow, then remove the tins to cool over a wire rack. Cut into wedges and serve warm with your favorite stew or even Pav Bhaji.

Bon appetit!
This post is being Yeastspotted.
The ‘We Knead to Bake’ project 2013 : Hokkaido Milk Bread

Its not conventional to think of bread and associate it with any thing Japanese, after all Japanese cuisine is predominantly rice & fish based if you go with the conventional thought process. This may be the reason why this months baking project from +Aparna Balasubramanian came as a ultra pleasant surprise. The bread is known as Hokkaido Milk bread (disclaimer, Its been less than a month since I myself heard about the term) and it is by far the softest, fluffiest (feel free to add on your own choice of cute happy superlatives) bread I’ve ever had. The texture of Wonder bread minus the processed entrapped air!
The secret to this ethereal texture is the addition of a roux to prepare the dough. Referred to as ‘Tangzhong’, this cooked mixture of milk and flour confers the matchless texture. The secret here is to cook the flour and milk to 65 C at which point the gluten in the flour absorbs the liquid transforming into a gel like state that helps form a structure that holds up the shape of the bread). This ancient Japanese technique was popularized by Yvonne Chen through her book ’65 C Bread doctor’. The dough tends to be kind of sticky and hard to work with because of the added roux, so if you have access to a food processor or a Kitchen Aid stand mixer, just USE IT!
Apart from a traditional loaf, I also venture to try a filled bread, drawing inspiration from the iconic Bunny Chow of Durban, South Africa , the filling consisting of curried Puy Lentils. I’m just going to link to my recipe for curried lentils from an ancient post of mine for Curried lentil Crostatas.
In the interest of full disclosure, I must admit I goofed up the recipe the second time around by completely forgetting to add the butter required in the recipe. Much to my relief, the bread was perfectly soft and edible the morning after even after being cut and left out.
Thanks Aparna for yet another superb pick of bread, here is the link to her original post of the Hokkaido Milk bread.
Hokkaido Milk bread (adapted from the recipe on Kirbies cravings)
You need:
For the Tangzhong:
1/3 cup All purpose flour
1/2 cup milk
1/2 cup water.
Whisk the flour into the milk and water in a saucepan ensuring that there are no lumps. Heat the mixture on a gentle heat (using a thermometer to measure the critical temperature of 65 C). If you don’t have one, no worries, just keep whisking the mix on a low/medium heat until the roux begins to thicken. when the whisk leaves behind peaks in the roux and the consistency is like that off soft pudding, remove from the heat, cover and allow to cool completely (~ 2 hours).
For the Bread dough:

The dough is sufficient to make one loaf (using a 9×5 loaf tin) or 8 rolls in a muffin tin. Depending upon what you are making, butter and flour the surface of the respective baking pan.
Transfer the dough onto the working surface. you do not need any flour to help shape the bread. for the loaf, roll out the dough to a rectangle of about 9 inch wide and 15 inches long (approximations are fine). Fold into a rectangle of about 9 by 5 inches (as if you’re folding a letter) and roll out once again to stretch the width. Roll the dough along the length pressing the edges into the dough and pinching the sides.

Using a sharp knife, make diagonal slashes into the dough. Brush liberally with cream, cover with a plastic wrap and allow to proof for a second time for about an hour.

Bake in an oven (preheated to 325 F) for about 25 – 30 minutes until the top has browned and the bread sounds hollow when tapped.

Allow to cool in the loaf pan for about 5-10 minutes before tapping it out onto a wire rack to cool.

For the curried rolls:

Divide the rolls into 8 approximately equal parts. Roll out a portion of the dough into a 6 inch circle. Spoon in 2 tablespoons of the curried lentils onto the center of the dough.

Fold the edges together & seal the the dough as shown above. place into a buttered and floured muffin tin and brush well with cream. Cover loosely with a plastic wrap and allow to proof for about 45 minutes.

Bake in a 325 F oven for about 20 minute until the tops appear to have a golden brown color. Allow to cool for about 5 minutes in the muffin tin before flipping them out to cool on a rack. Serve warm with a pat of fresh churned butter!

This bread is being yeastspotted!

Bon appetit!
The ‘We Knead to Bake’ project 2013 : Classic Croissants

As divine as they are, it is virtually impossible to polish off 16 at one go, so feel free to divide the dough on day 3 and return one half of it to the refrigerator (if you plan to use it up within the next day or two, or freeze it for use at a later time). I opted to used a South Indian style filling on my second half,made with fresh coconut, jaggery and cardamom. This filling is a classic recipe called ‘Thengai poornam‘ in Tamil. It is used for ‘Modak‘, a sweet rice dumpling. I decided to christen this version ‘Pain au poornam’! I’ll post this recipe next week once the foundations of prepping the classic croissant dough have been established.
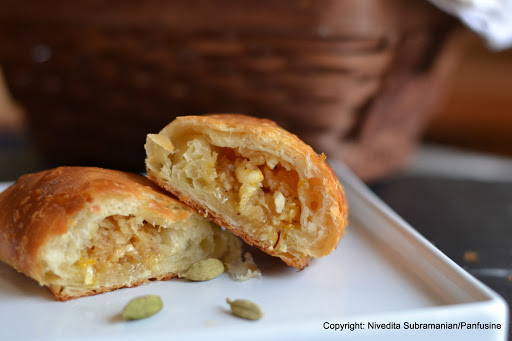 |
| Pain au ‘Poornam’: Croissants with a coconut, jaggery & cardamom filling |


Bon appetit!

Countdown for my ‘ A Dish – a Day ‘ blog – Day 7

December 25 is not really a day to spend in front of the laptop, trying to compose a post about a new recipe. This is a day to revel in the joy of watching the kids opening their presents and the jaw dropping realization of how quickly they're capable of trashing a room in minutes, but then again, my resolution is getting the better of me. As Indian style breads go, there is no dearth to what may be mixed into the dough and with each new ingredient , there is a different unique flavor profile.
Countdown for my ‘Dish – a – day blog’ – Day 10

Of all the countless New Year's resolution I've made over the past decades, I cannot really recall a single one that I've kept and seen through over the next 365 days. And when I started my other daily blog 'A Dish a Day' on a whim on Jan 1st 2012, I honestly never really expected to go past April (counting all the dishes I had whipped up for this blog and the numerous community picks that I've had the privilege of testing for Food52). This is not taking into account the inherent lethargy that I was sure , would make me skip days at my whim.
Recaps & Rosemary Parathas


 |
|||
| The Hallowed Food Network Kitchens! |


This was clearly one of my highlights from my life as a food blogger and needless to say, this was my general state of mind when I got back home!
As I get ready for my Big 100th blog post next week, (no clue yet as to what I’m going to create), This weeks recipe is one that has been a staple at home for a couple of months now. The last time I took photographs of the process, they got ‘swallowed up’ by my old laptop that croaked on me. I’m pretty sure that Rosemary has been incorporated into Parathas way before I stumbled on to the idea, but one thing is for certain, the taste is unforgettably delicious.
Rosemary Potato Paratha: (makes ~ 6 parathas)
You need:
For the Dough:
2 cups whole wheat flour (preferably Roti Atta Flour)
a pinch of salt
~ 6 oz water.
Combine the flour & salt, add the water in increments & knead to make a firm ball of dough. Divide into six and cover with a wet towel until ready to roll into parathas.
For the Filling:
2 large Yukon gold or Idaho potatoes
1 large sprig Fresh Rosemary (leaves stripped off the twig)
1-2 small fresh green chili. (adjust as per your taste)
1/2 teaspoon kosher salt (adjust up or down as per your preference)
Juice of 1/2 a lime.
Melted ghee for brushing the paratha.
Finely chop the chili and Rosemary leaves almost to a minced consistency.
Wash & cut the potatoes into half & boil till a knife slips through with little resistance through the cooked tuber.
Drain excess water, peel the potatoes and place in a mixing bowl along with the salt, lime juice and finely chopped rosemary & green chili blend.

Break the hot potatoes so that the steam is released. This helps the filling to be as dry as possible. Mash the potatoes to crush any lumps to get a smooth filling. Shape the filling into spheres, approximately the size of ping pong balls.

Roll a portion of dough into a 6 inch flat tortilla. (use a generous amount of extra flour to ensure that the dough does not stick to the surface or rolling pin.).
Place a ball of filling and roll the dough around like you would do for an enchilada. Pinch the ends & fold over so that the filling is evenly enclosed within the dough.

Flour the board & gently roll out the the potato filled dough into a 5 inch circle.
Heat a flat griddle and add place the paratha on it. Brush liberally with ghee, after two minutes flip to the other side and brush the other side with ghee as well. The paratha is done when both sides have turned a golden brown with tiny black spots. Serve with a Raita of your choice and Indian Mango or lime Pickle.

Bon Appetit!
