The ‘We knead to bake’ project #11: Swedish Cinnamon buns -Kannelbullar / Kannelsnegle (cinnamon buns/snails)
You need:
Starter:
Tear off chunks of the dough and add it incrementally into the bowl of the Stand mixer. keeping the machine running, gradually add the sifted flour mixture, Orange zest and the sugar and allow the ingredients to mix well.
If you’re making the spiral cinnamon rolls, spread the filling evenly over the whole rectangle
Roll the dough tightly in a jelly roll/Swiss roll style, gently pinching the edge to seal. Cut into 20 pieces using a sharp knife and place them on a lined baking sheet (making sure to leave enough space in between), or on a cupcake case.
For the twisted version, spread the filling over half the length of the dough as shown below. Fold over the half spread with filling and cut into 20 strips with a sharp knife. With each strip, cut a slit almost along the length such that the strip looks like a ‘trouser’.
Twist each leg as shown above, cross the ‘legs’ over and press the ends together under the uncut part of the dough. As with the spiral rolls, place the rolls in a lined baking sheet or in cupcake cases with plenty of space in between.
Allow to rise for about 15 minutes (the buns will look a bit puffy, not fully risen), brush with milk and sprinkle pearl-ized sugar (or egg wash). Place in a preheated 400 F oven to bake for 15 minutes until they appear golden brown and sound hollow when tapped. If they seem to be browning too quickly, turn down the heat to 375 F.
Turn out to cool on a wire rack. Serve warm or at room temperature with a hot cup of coffee. These Kannelbullar freeze well, so store the extra away for a rainy day. Just heat one or two in a microwave whenever the craving strikes.
This post is being Yeast spotted.
Quick post.. A tutorial on Idlies?
I had no idea of what I would be blogging about, or even if I was going to post today. Yes, there are a couple of posts sitting in my drafts column, that I was to publish in the next couple of day, but it was never going to be plain Idlies.
So, back to basics? What are Idlies? Answer: they’re basically spongy steamed cakes made with a fermented rice and Urad lentil batter. The perfect healthy blend of protein & carbs, The fermentation confers a depth of Umami and one of the best things is that you can pair the cakes with just about anything, Sugar, ketchup, Sriracha, and the usual chutneys, the milaga podi, Sambar & yes, Fresh home made yogurt.
The purpose of this post is not about sharing a recipe for idli. Its a classic national dish and there are countless sites you could get it from. Its about discussing the myriad ways that one could shape them. I’ve been making unconventional Idlies way, way before I even knew that there was such a thing as food blogging. (even if a certain pompous dame of the British Empire claimed along with BBC Good Foods (India) magazine that they invented the cupcake mold version.), And I’m not alone, countless mothers must have done this before me. And it was out of pure necessity, in other words, getting my kids to eat healthy stuff in cute forms. Silicone cupcake molds were merely the first. They could be fitted into a conventional Idli stand with the lenticular molds and steamed, and yes filled up with fresh blueberries or even a Hersheys kisses pressed in for a molten chocolate variety.
Well, Its been years since I revisited the shaped idlies until yesterday when I spotted some long forgotten silicone molds from years ago and opted to make a kid friendly lunch for my son to get the week kicked off.
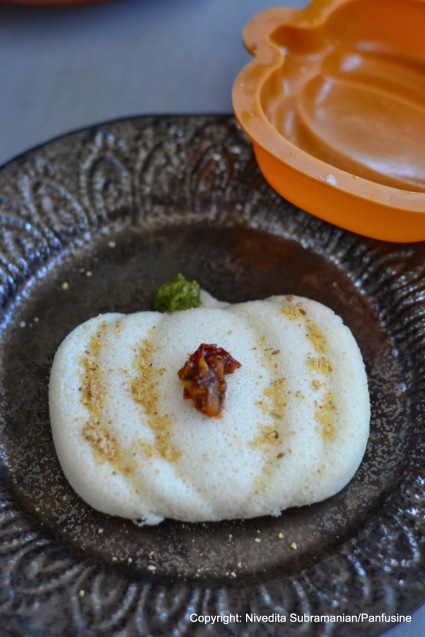
Before I knew it, I was out looking for more shapes just to use for this post. It turns out that Crate and Barrel the store from which I picked up the pumpkin and leaf mold had discontinued them and I had to settle on this Ice cube tray.
well, they worked perfectly, did not twist out of shape when I lifted the tray onto the pan to steam, and the best part, the idlies just dropped out, unlike the conventional mold where you need to scoop them out.
MOLDED IDLIES
I’m just going to link the detailed recipe for the idli batter from my friend Dhivya’s blog ‘Chef in you’.
The Tovolo Jumbo ice cube tray accommodates 2 oz of batter which produces a near perfect cube.
Brush the inside surfaces of the tray with oil. (it isn’t really necessary, since the silicone does release the finished product, but the oil really helps in sliding the entire cube out without even a morsel sticking to the pan).
Ladle the batter into the sections of the ice cube tray. Place the tray over a steamer basket in a skillet (with a cup of water added to the bottom. Cover with a lid and steam for 10-12 minutes on medium heat.)
If you do manage to spot silicone molds in different shapes like this pumpkin, pick them up, the work great for pretty party designs. (2 – 3 oz of batter steamed for 12 minutes). The only drawback is that you have to make them one at a time (or have a really wide skillet and an equally large lid to keep multiple molds flat without squishing them.)
So go ahead, think outside the mold and let the idli imagination run wild, your kids will love you for it!
Bon appetit!
PS: An update: For more intricate shapes like this gorgeous snowflake, Just make sure to oil the inner surface of the mould design that comes into contact with the batter, Steam and allow the mold to cool down completely before attempting to push out the idlies. I used a seasonal silicone ice cube tray to make these beauties.
Thanksgiving treats: Cheeseless Pumpkin Cheesecake
I’m gracefully resigning my self to the crisp cold sunny days of Fall, and beginning to look forward to the seasonal bounty that the season brings along, The bright colored winter squashes & pumpkins, the gemstone colored cranberries, Persimmons, pomegranates..and the list goes on.
The recipe for this post ironically uses none of these, relying instead on a canned ingredient. Yep, I’m referring to the good ol’ canned pumpkin that makes its appearance around now.
Its convenience lies in the fact that the texture and flavor is consistent and pleasantly enough it wasn’t too sweet, which meant that I could use the contents from the same can in a dessert as well as a savory spinach curry.
Back to the ‘Cheeseless’ Cheesecake: I’d first tried Raghavan Iyer’s recipe for the 10 lb Cherry Challenge that was hosted by Oxo . The dessert is basically a classic Bengali bhapa Doi , a steamed yogurt that is flavored with cardamom. This time around, I tweaked the recipe with the addition of pumpkin puree and a spice blend of cardamom, cloves and cinnamon.
Cheeseless Pumpkin cheesecake (Recipe inspired and adapted from Indian Cooking Unfolded by Raghavan Iyer)
You need:
2 1/2 cup plain low fat Greek yogurt
1/2 cup Pumpkin puree
1 can condensed milk
1/2 – 3/4 teaspoon spice blend* (as per taste) -see the note below the recipe for instructions
18-20 strands saffron
8-10 Pistachios for garnish (optional, leave out if concerned about nut allergies)
9 ramekins (4.0 oz / 1/2 cup volume)
Plenty of boiling hot water in a kettle
Preheat the oven to 350 F.
Combine the yogurt, condensed milk, spice blend and the pumpkin puree in a mixing bowl and whisk to thoroughly combine
Ladle the mixture evenly into the ramekins. Garnish each bowl with 2 strands of saffron and microplane the pistachio over the mix. Place the ramekins in a large baking pan. Fill the baking pan with about 3/4th inch of the hot water.
Place the water bath into the oven. Bake for 30 minutes. Remove from the oven, allow to cool and refrigerate for atleast 2 hours prior to serving. Garnish with a piece of sugar glass ** and serve chilled.
** Sugar glass
In a saucepan, combine 1 cup of sugar and 2 table spoons of water.
Bring to a boil to completely dissolve, keep stirring with a wooden spoon, lower the heat and allow the sugar to cook down beyond the hard crack stage. Keep 2 sheets of silpat silicone mats next to you on the counter. Once the sugar solution begins to turn a light amber, remove it from the heat. Allow the sugar to cease bubbling. Carefully dip the wooden spoon into the molten sugar and drizzle the liquid onto the silicone mats, making random criss cross patterns. Allow to cool completely before gently breaking the pieces. store the pieces in an airtight jar.
*Spice blend:
2 cardamoms pods (just the seeds)
4 cloves
1/2 teaspoon powdered cinnamon
1/8 teaspoon powdered nutmeg
Combine all the ingredients and crush to a fine powder using a mortar & pestle. Use the required quantity of the blend.
Bon appetit!
The ‘We knead to bake project’ # 10 – 100% Whole wheat bread
When using flours that are not subject to heavy processing like all purpose flour is, its essential to understand the starting material in order to create a flavorful bread. WHeat flour is a jumble of bran, germ & starch. Starch yields the familiar flavor of bread, but cannot effectively do so in the presence of plain bran & germ. These nutrient rich components need to be coaxed to release their flavor, soften and undergo a bit of enzymatic change before they release their goodness, and Reinharts technique aims to ensure that perfectly.
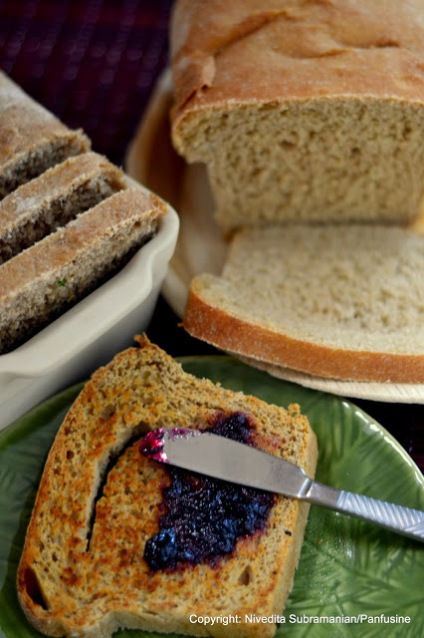
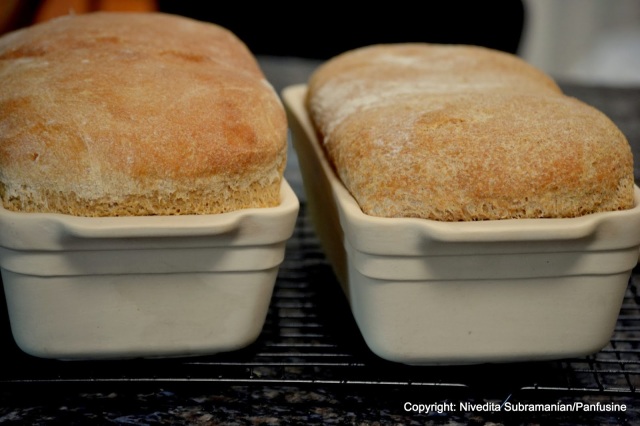
I opted to use Lemon juice in the soaker and sponge in order to help the strands of gluten develop (gluten is a protein which ‘clump’ together in the presence of acid) and also boosted up the gluten up a notch by adding a bit of extra wheat gluten. My first loaf was with a regular whole wheat flour without gluten, the second with a coarser whole wheat Pastry flour, and the third with an organic whole wheat flour from India that I use to make roti. Needless to say the softest was the third one, while the pastry flour bread yielded a nutty flavor & a chunky texture. The first loaf I made was riddled with a number of errors and did not rise quite as much as a consequence.
Step 1- Making the soaker and the Biga/Sponge:
Inviting Light & Prosperity into our homes – Happy Diwali.
Ever notice the best festivals & feasts usually occur towards the end of the year? I think it has everything to do with the days getting shorter. In South India the season kicks off with Krishna Jayanti in September, followed by Navratri, Diwali, Karthigai, Combined with Labor day in September, Halloween, Thanksgiving , Christmas & New Year celebrated in the US of A, thats a lot of festive days to look forward to. No wonder it gets dreary once January 2nd comes around, but then by that time, the days begin to stretch out longer again.
The concept probably precedes religion, or co-evolved along with it. With the end of harvests, It was time to huddle up and and spend the cold months waiting for the seasons to change again. Festivals must have been a natural social response in the absence of much to do and of course to dispel the invariable fright that darkness brings.
Well, I’m certainly not complaining, the plethora of opportunities to indulge in kitchen capers, the shopping spree for ingredients, whats not to love?
At home there are traditional dishes and then there are the creative ones, and the ones I like best, the healthy creative ones, the stuff that you can scarf down without having to worry too much about the amount of fat that went into it. This year the confection list included the decadent ‘T-B-A shortbread’
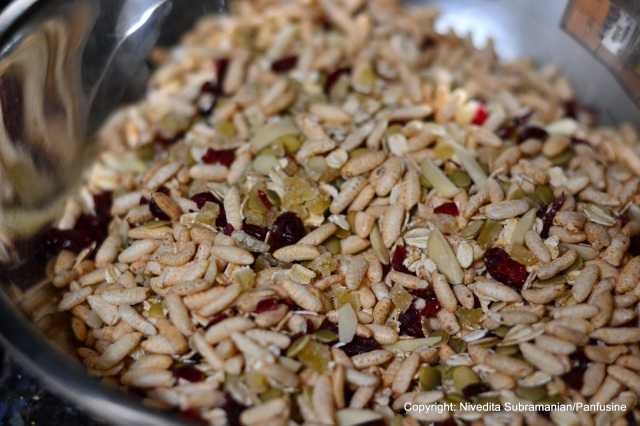
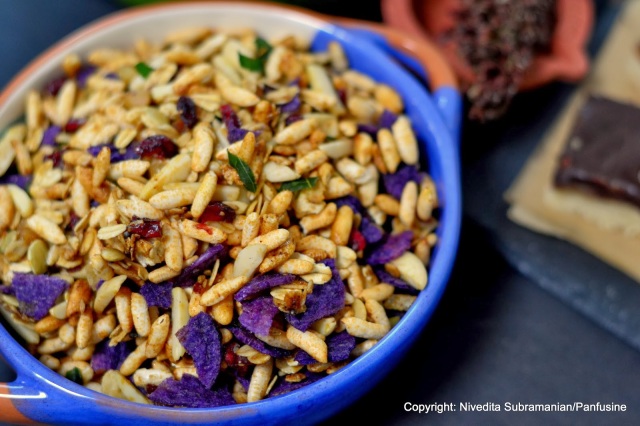
and a baked granola like chivda which I’ve been gulping down by the handful. This snack is common throughout India and has more than one name depending upon which state its made, Chivda, chevdo, chanachoor, mixture. Each state adds its own flavoring and ingredients. Raisins are common in the Maharashtrian version, plantain chips & curry leaves in the South Indian Mixture, Sugar in the Gujarati version and so on. The common thread in all these versions is that the final mix is invariably deep fried.Growing up in India, one of my favorite things about Diwali was savoring all the different versions that were exchanged between the neighbors and to this day, I cannot think of any one version that stood out. I loved them all with equal delight!
This weeks Diwali post combines all my favorite aspects of the chivda variants and makes it healthy to boot. The only deep fried part is the addition of broken purple potato chips. they make a beautiful contrast to the dried cranberries added to the mix.
Baked Granola Mixture
You need:
2 cups puffed brown rice cereal (the unsweetened type, I used Arrowhead Mills)
1 cup Rolled oats (Bob’s Red Mill has a great product)
1/2 cup sweetened dried cranberries or dried cherries, chopped
1/2 cup candied ginger, chopped
1/2 cup slivered almonds
1/2 cup raw pumpkin seeds
4 oz kettle cooked potato chips (the thick ones)
For the tempering:
4 tablespoons sesame or peanut oil
1 heaped tablespoon black mustard seeds
1 tablespoon cumin seeds
2 sprigs curry leaves finely cut into a chiffonade
1/4 teaspoon asafetida powder
1/4 teaspoon Cayenne pepper powder
3/4 teaspoon fine sea salt
3 tablespoons molasses
Line 2 cookie sheets with Aluminum foil. Preheat oven to 225 F.
Combine the puffed rice, oats, sweetened dried cranberries, ginger, pumpkin seeds and almonds in a large bowl.
Heat the oil in a cast iron pan. once it begins to shimmer, add the mustard seeds. Once they’ve ‘popped, add the cumin seeds. (Cumin fries much faster than mustard and thats why I add it after the mustard). Once the cumin seeds ‘split’, lower the heat and add the curry leaves. Stand back since they tend to sizzle and spatter oil around, thanks to the inherent moisture. Turn off the gas or remove the pan from the heat and then add the cayenne, salt and asafetida. Last, add the Molasses (it helps to use a spoon coated with oil, to ensure that all the molasses just drips off the spoon without sticking).
Pour out the mixture into the center of the bowl with the other ingredients. Fold gently to coat evenly.
Distribute the mix evenly between the two baking sheets into a thin uniform layer.
Place into oven and bake for 20 minutes, making sure to stir the mix every 10 minutes. At the end of the 20 minutes, increase the heat to 250 F and bake for 10 minutes more. This ensures that the almond slivers get nice and crunchy. remove the trays from the oven and allow to cool completely. Crush the potato chips lightly and blend into the mix. Store in an airtight container once cooled completely.
Wishing everyone prosperous times ahead. Happy Diwali!
A piece of cake – Victoria sponge with orange zest.
As many of you who’ve been following my blog know.. I’ve been known to run away from eggs. Run, literally scamper out of the way. Just as an individual with a Parietal cortex stroke, my brain effortlessly used to come up with the most ridiculous of excuses to avoid buying them when my son asked me. It finally hit my head that it wasn’t fair to my son that I should deprive him of a food he was curious to try, and I began to gradually bake cakes. Yes, I still clear out the counter around the ‘future’ cracked eggshells like a bomb disposal squad clears out curious onlookers and for once, I’m extremely prompt in clearing up and washing the dishes that the eggs have been in contact with, just to ensure there is no trace of any ‘eggy’ odor. And for helping me get over my neurotic aversion, I have my Food52 friends, Cynthia, (the Solitary cook) & Mrs. Larkins, (a.k.a the Scone lady) to thank, they were instrumental in getting me out of this crazy loop.
My go to book for cake recipes is this magazine promotional book from Australia, published in 1985. Yes, I used to bake way back then, with the same trepidation, but had mommy’s hand to hold on to for support, so the fear never became apparent. Getting such books in India in the 80’s was a luxury and it was by sheer luck that my mother spotted this book at the local stationery store in Chembur, Mumbai. Each and every recipe I’ve tried from this book has been a straight forward success and I will post more recipe as I make them, with full credit to the source.
The only addition I’ve made to this recipe is the addition of orange zest,For the sandwich filling, I personally like warming up some marmalade and slathering it in between the layers, but chocolate ganache will work splendidly too.
Victoria sponge: (Recipe from Great Cakes, a magazine promotional book from Womans Day (Australia) & white wings brand Flour)
You need:
2 cups (280 grams) Self raising Flour (I used the King Arthur brand)
2 sticks + 2 tablespoons (18 tablespoons) unsalted butter, softened
1.5 teaspoons vanilla extract
4 eggs lightly beaten
1 cup sugar
1/8 teaspoon kosher salt
1.5 heaped tablespoons finely minced orange zest.
Confectioners sugar for dusting.
For the filling:
1 cup warmed, melted orange marmalade
OR
1 cup chocolate ganache
- Preheat oven to 375 F.
- Cut out 2 nine inch circles of parchment paper. Grease the bottom & sides of 2 circular baking tins with butter. Carefully press down the parchment paper onto the base of the tins.
- Measure out the flour and add the salt. Sift to combine.
- In a stand mixer add the butter and Vanilla extract.Keeping the speed at the lowest setting, beat the butter until soft. Add the sugar gradually along with the orange zest, (increasing the speed slightly) and continue beating the mixture until it turns light and fluffy.
- In the meantime, crack the 4 eggs into a bowl and whisk them. Add the mixture very slowly into the creamed mixture of butter and sugar. (adding the eggs quickly causes the mixture to curdle). In case the mix does curdle, dont worry, simply add in a bit of the flour that you’ve measured out for the cake. Once the eggs are incorporated, gradually add in the flour and mix gently until all the flour (including the bits sitting on your paddle attachment) is well combined.
- Divide the dough equally between the two baking tins and smooth over the surface using a large offset spatula.
- Place in the middle rack of the oven and bake for about 30 – 35 minutes until the center of the cake feels ‘springy’ to the touch of your finger tips.
- Remove the cakes onto a cooling rack. Once the cakes are completely cool, sandwich together using either the warmed marmalade or the chocolate ganache. Dust the top with confectioner’s sugar as per your preference. Cut into wedges and serve with afternoon tea.
 |
|||||
| My kids & I decided to use the cakes from an earlier baking session to try our skills at decorating.. |
Bon appetit!
Garlicky Herbed Lentil & Carrot Pilaf:
I hate negativity, I’d much rather spend my time in the Lab doing what I love best, running my experiments, taking measurements, analyzing & visually recording the results. Or, in blogger-speak, create a recipe, clear my kitchen counters, prepare the dish, take photographs & then tuck into my creation. I’d rather not have written up my last post, my response to Martha Stewart, but there was something so smug about her tone in the interview, non verbal, that my pre-frontal cortex just had to sit back and support my lower brain in lashing out. It was not easy, for every 2 sentences I put down, I had to erase one. It was a learning experience, one that made me determined to never let my self imposed guard down when it came to to the quality of the recipes I post and never be stingy on listing references & inspiration, however insignificant or indirect.
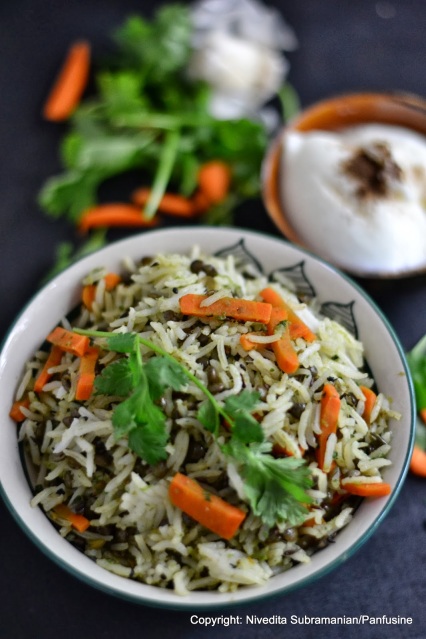
Today’s recipe was both an example of something hurriedly cobbled together into a one pot dish that had a healthy proportion of carbohydrates, protein & vegetables, as well as a dish inspired by someone else’s recipe. The combination of herbs was the brainchild of Liz Larkin, a.k.a The scone lady. and it was for a recipe of Pan fried Fragrant Cauliflowers that I discovered on Food52.
The flavoring from this ‘masala paste’ left such an imprint that it begged to be tried again, despite the obvious lack of a resident cauliflower, in fact, the lack of any other convenient vegetable, except for a bag of bunny food,viz carrots. Combined with some lentils (I have 1/2 a dozen varieties sitting in my pantry, neatly labeled) & cooked Basmati, The two dishes, compared side by side, have no relation to each other, and yet, the root flavoring is the same.
Since I had hurriedly cobbled up the first batch and the family polished off every morsel of it, I went back & recreated the dish before the combination of spices & tastes slipped out my my brain & food memory. The results were identical the second time around as well. the combination of lentils & rice is reminiscent of the Middle Eastern dish Mujaddara, accompaniment of choice for Mujaddara is yogurt, and the same works perfectly for the ‘carrotty’ version as well.
Garlicky Herbed Lentil & Carrot Pilaf:
You need:
2 cups Basmati rice
4 cups boiling water
1/2 cup whole lentils (I used the green French Puy lentils)
2 large carrots, cut into sticks
2 – 3 tablespoons olive oil
4 tablespoons ghee
1 teaspoon nigella seeds
1 teaspoon fennel seeds
2 dried bay leaves,
Salt to taste.
For the paste:
2 heaped tablespoons minced or chopped ginger.
2 serrano chiles, chopped
2 cloves garlic
1/3 cup chopped cilantro, plus extra for garnishing
Rinse the lentils in plenty of water. add to a saucepan along with 2 cups of water, bring to a boil and allow the lentils to cook until soft, retaining their shapes and not mushy. Drain and set aside.
Rinse the Basmati rice until the water runs clear. In a heavy bottom pan, add 2 tablespoons of ghee, and ‘toast’ the rice until the grains begin to turn opaque. Add 1/2 teaspoon of salt along with 4 cups of boiling water. Stir to dislodge all the grains sticking to the bottom of the pan, cover and lower the heat to the lowest setting. allow the rice to cook until all the water is absorbed. Uncover, allow to cool slightly & fluff with a fork to separate the grains.
Combine the cilantro, serrano chile, garlic and ginger and blend to a paste. I used a Mexican mortar & Pestle, the molcajete, just so that I could have some irregular texture in my blend. (plus there’s something so relaxing in using manual tools, just builds a connection to your food.)
Slice the carrots into thick ‘coins’ at a diagonal angle. Then stack up 3-4 of these coins and cut into little ‘sticks.
Heat the remaining ghee and the oil in a large skillet once the oil/ghee mix gets hot, add the nigella and fennel seeds along with the bay leaves. (No particular reason for adding these spices, Mrs. Larkins recipe doesn’t use ANY spices for the cauliflower. I just happen to love the nigella fennel combination). Add the cilantro/chile/ /ginger/garlic paste to the tempering and fry until the paste begins emitting a divine aroma. Add the carrots and saute until the carrot softens slightly (they should still retain a ‘crunch’) and then toss in the cooked lentils.
Season with salt (remember the Basmati already is salted, so adjust accordingly), allow any remaining moisture to dry up.
Add the lentil mixture to the rice and fold in until the carrots and lentils are evenly dispersed. Garnish with the remaining cilantro and serve warm.
with a side of yogurt, Raita or Tzaziki.
Bon appetit!
‘Martha Speaks’ — and my reply..
Dear Ms. Stewart,
This is probably the ‘n’ th (where ‘n’ is a sufficiently large positive integer) response from the blogosphere to the condescending remarks you made in your interview. And in true blogger style each one of those that I’ve read so far is a signature of the author who composed it. Let me answer you in the language I know best.
Who are these bloggers? Well, Ms. Stewart, we are a large networked group of men & women who are extremely passionate about what we do. What’s remarkable is that everyone of of us chose to do this of our volition, without any delusional assumptions of striking it rich, Monetary returns are simply bonuses, a validation that we must be doing something good. We reap ample rewards through encouraging feedback from our followers, who make it a point to let us know how much they enjoyed cooking & sharing our creations at their kitchen table with the family. I doubt whether you would ever know that on a personal level, you probably have (underpaid) interns taking care of your mail.
Are they editors at Vogue magazine? I’m surprised that you chose to indirectly drag in likes of the inimitable Anna Wintour , editor-in-chief of Vogue (America) and her senior staff into this discussion. Because in doing so, you inevitably draw attention to comparisons to yourself. Ms. Wintour is well known for her dignified reluctance to submit herself to interviews. Her actions speak louder than her words, quite the opposite case w.r.t the context of your chatty interview. We bloggers may not be and don’t particularly care to be, editors at Vogue, just as you, Ms. Stewart, are not, and will never be ‘Anna Wintour’.
While on the topic of recipes, Our reputation as trusted bloggers is built one tested recipe at a time. We neither have the luxury of limitless access to the best of ingredients nor the best photographic equipment that money can buy. We are usually a one man/woman operation, right from concept, visualization, creating, testing, analyzing the recipe, as well as prepare the final report with photographs and discussions/anecdotes to post on the blog. Martha Stewart Omnimedia (MSO) probably has departments dedicated to each of those, and I doubt whether you’ve even personally tried making even 1% of the recipes you publish. If my recipe doesn’t taste or look right, it never sees the light of day, and don’t forget, that’s a chunk of my grocery budget that gets wasted. And yet, judging by the number of comments about dud recipes from the Martha Stewart machinery, … lets do the comparative math, shall we?.
On a personal note, (and this includes many other bloggers with a similar background) I chose to become a blogger after training to be a scientist. in other words, just traded a laboratory bench for a kitchen counter, I treat my recipes like a scientific SOP, documenting every step with the same level of importance as a plasma or DNA sample, and I take pride in discussing any inspirations from other recipe sources like journal references. (terms that you, Ms. Stewart, probably never even heard of, despite your dubious association with Imclone)
Yes, There are a few naive, uninformed or simply unscrupulous bloggers among us, pilfering recipes, photographs and sometimes entire blogs, and not a day goes by when we aren’t contemplating filing DCMA’s or complaints on the social media against these bad eggs. In many cases these include ‘reputed’ magazines who’ve lifted recipes & photographs without due credit, Unlike MSO, we do not have legal budgets to spend on litigation.
When you make condescending remarks, painting all bloggers with a ‘Martha Stewart Blue’ colored brush, you blatantly insult the likes of stars, such as David Leite, Donna Currie, Elise Bauer, Dara Michalski, creators of multiple fail proof recipes, not to mention Ree Drummond, one of Food Networks upcoming stars, also a blogger. And don’t even get me started on Food52, a blogger friendly crowd sourced start up success story from Amanda Hesser & Merrill Stubbs.
Your interview with Bloomberg weekly displayed a snobbish arrogance, of an egotistical Pride. Even as I try to think of the proverbial Horses instead of Zebras after hearing you, and see the graph of your company’s stock prices decay at the same rate as that of radioactive rhodium, my involuntary thought process goes back to that saying “Pride rides before…”
Regards,
Nivedita Subramanian.
Coming up: A recipe for Garlicky Herbed Lentil & Carrot Pilaf:
Recreating flavors (or at least trying) – White turnip stew with toasted Chana dal.
Turnip ‘Kootu (Stew) with toasted Channa Dal


 .
.


